I also contemplated doing a video tutorial but that would involve you (and worse still... ME!), listening to my voice, and I just couldn't cope with that just yet!
So, I use a 2.5" strip for binding (unless using flannel in which case I use 3"). It needs to be the length of the perimeter (outside edge) of the quilt, plus a minimum of 15" (40cm). It needs to be continuous and ironed in half lenghtwise.
Pick a starting point (I usually pick a side, about 2/3 the way down). Leave a tail of at least 8" (this gives a little wriggle room at the end), and on the right side of quilt, match raw edge of binding with the raw edge of quilt. Pin from here down to the first corner.
I stitch about a 3/8" seam allowance (1/4" is too narrow and will leave your binding too thin, 1/2" will be too thick and when you pull your binding over to the back to hand stitch down, it will not cover your stitch line.
Stop 3/8" from the corner, you can reverse here, then take out from the machine. Turn your quilt as if you are about to sew down the next side (which, oddly, you are!).
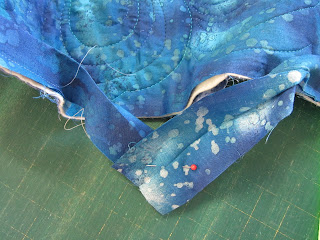
Fold your binding up, so the raw edges from your binding are in line with the raw edges of your quilt.
Now fold again downwards, so that raw edges are aligned on the side and the 'fold' of the corner is in line with your raw edges on the previous side.
When you are on your final side, stop, and leave a gap of no less than 8" from where you started.
Now for the fun bit!
You have two tails. Cut one tail so it is just over half way (make sure it is a straight cut and at 90degrees).
Lay the other tail on top, and measure on overlap of exactly(!!) 2.5". And cut (eek!! ... make sure you have this right).
Now, join the two ends on a diagonal by placing them at right angles (as you do your binding strips).
Before you cut off the seam allowance, pull out and make sure it sit flat, which it should do perfectly of course (that's because you're an expert now!!), then trim off, sew the binding down to the final gap and your done... well.... except for hand sewing in down on the other side of course!
Incidentally this is actually one of my favourite parts of quilt making, sewing down the binding. To me, you have put a lot of love, time and effort... perhaps passion (and maybe even a tad of blood sweat and lot of tears) into this quilt, and now this is it. The 'piece de resistance', or as I like to say the 'icing on the cake'! I find it completely satisfying, if not a tad time consuming (especially when I have to stop to pat myself on the back regularly!)
So sit back and enjoy crossing the finishing line!
Michelle xxx
p.s. It might amuse you to know that I had almost finished sewing the binding down and taken most of the photos, when I noticed that I had sewn it to the back of the quilt... arrrghhhh (more unsavoury words!!). Another lesson.. when you aren't feeling well and dosed up on cold and flu tablets, perhaps it is best to leave sewing til another time! (this is why, if you are really observant, you will notice a difference in fabric on the border.. its because in some photos, its actually the back!)

.JPG)


.JPG)
